Make Your Own Healing Lotion Bars
by Gaye Levy
About a month ago, I thought to myself, “Self, wouldn’t it be nice to have some of my healing salve in lotion bar form?” This has been something I have often considered but as with a lot of projects, it kept moving to the back burner. Finally though, I got serious and in order to keep myself on track, reported my intentions on the Survival Buzz.
Before we start, let me say this. Making lotion bars is so dang easy and the results so darn great, I should have done this months ago.
What Are Healing Lotion Bars?
Lotion bars can be many things but for the purpose of this article, healing lotion bars are solid healing salves that are firm to hold, like a bar of soap, but extra moisturizing, like a lotion. The healing comes from the base of coconut oil and Shea butter (although other oils can be used), and therapeutic essential oils.
Widget not in any sidebars
Healing Lotion Bars – The Recipe
Making these Healing Lotion Bars is super simple. The ingredients are readily available and although you can use a fancy mold like I did, you can also use a muffin tin or even an ice cube tray for shaping the bars. But I digress. Let’s start with the recipe that, after some trial and error, I feel is just perfect!
Ingredients
1/2 cup Coconut Oil (I used Tropical Traditions)
1/4 cup Shea Butter (I used 100% unrefined from Amazon.com)
1/2 cup Beeswax Pellets
25 drops each of Lavender, Peppermint & Rosemary Essential Oils (I used Spark Naturals)
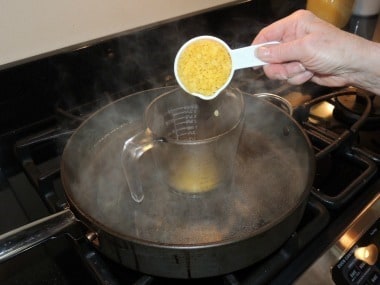
Set a pot of water on the stove and bring it to a slow simmer. You may also use a double boiler but I prefer using a pot of water and a glass measuring cup as a make-shift version so I can better see the action. This also makes pouring the hot liquid into the molds safer and easier.
While you are waiting for the water, gather your ingredients so they are ready to go. Add the coconut oil and beeswax to your glass measuring cup and set it aside for a moment.
Measure out a chunk of Shea butter then chop it up a bit into smaller pieces. Also set the Shea butter aside for now.
When the water is simmering, add the glass measuring cup holding your coconut oil, Shea butter, and beeswax to the pan and let them melt. Do not add the essential oils; that comes later.
Give your brew a stir from time to time; this tends to speed up the melting of the wax. For me, this step took about 10 minutes.
When everything is nice and melted, quickly add the Shea butter. It will melt quickly which is what you want. While it is melting, stir it up like a crazy person. I read over and over that this prevents graininess so that is what I did. I used a dinner knife but you can use a spoon, fork, or even a chopstick.
Once the Shea butter is melted, quickly take your liquid off the burner and add the essential oils. I used the same oils I use in miracle healing salve (and in about the same proportion) but you can use whatever you want. Or none at all if you want a plain lotion bar.
Note: I use high quality oils from Spark Naturals for healing and therapeutic use but you can use your preferred brand. If you simply want nice-smelling lotion bars, feel free to use the inexpensive NOW brand from Amazon.
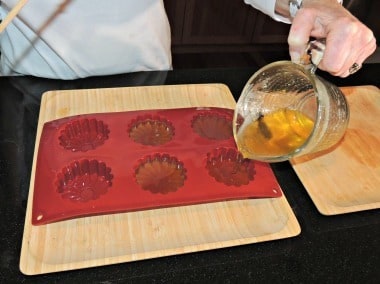
Quickly pour the liquid into your molds. I used this silicone daisy mold and love the results although during my testing and trial runs, I used muffin tins, both bare and with paper liners. They worked fine but were not as cute. And these daisy shaped lotion bars are very cute if not a bit quirky!
Set the healing lotion bars on the counter to firm up, or, do what I did and set them in the refrigerator to cool. They will harden up in an hour or two.
Once the healing lotion bars are firm, pop them out of the mold. They are ready to use as-is, although I find that they cure and harden a bit more over the next few days.
Helpful Hints
In my testing trials I learned a few things.
When using your make-shift double boiler, ensure that the level of water in your pot is high enough in the pot to melt the oils. More than once I had to add extra water, slowing down the process as it came back to a simmer.
I don’t know if oil burns but regardless, you want to take things nice and slow. Keep the water in your pan at a slow simmer and let the wax and coconut (or other) oil melt and meld together at their own speed. Give your ingredients a stir from time to time to keep things moving along but don’t try to rush.
Shea butter has a reputation for being temperamental and becoming grainy and unpleasant. I did not have that problem. I did, however, settle on a lesser amount of Shea butter than most of the lotion bar recipes I found online and in my eBook library. This is another case, in my opinion, of less is more.
Feel free to substitute other oils for the coconut oil. Olive oil, sweet almost oil, or a combination of oils will work.
The proportion and blend of essential oils is a personal choice. Feel free to experiment. For my healing lotion bars, I used the same oils that I use in my Miracle Healing Salve.
The recipe above made 1 1/4 cup of liquid lotion bar base so I chose to use the same proportion of 30 drops for every 4 ounces of base carrier oil (in this case coconut oil, Shea butter, and beeswax).
Be mindful that you do not contaminate your lotion bars with water since even a few drops will mess up the results and possibly cause surface mold to appear over time.
In addition to molds, you can pour the liquid into repurposed deodorant tubes or mini-tubes like these I purchased online.
Shelf-life will depend upon storage conditions. If you live in a warm climate, consider making small batches like I did and then storing your backup supply in the refrigerator.
My best guess is that shelf-life is abut six months but this small batch will be used up long before that.
How to Use Healing Lotion Bars
I have been using these healing bars for two weeks now. I have rubbed them on my legs and feet before bed to mitigate those dreaded leg and ankle cramps that only like to visit at night. I have also used them sooth dry, itchy skin and of all things, on my face as a night time moisturizer.
It is so easy to pick up a bar and use it wherever I happen to be. In addition, Shelly has been carrying the mini-tube version in his pocket to slather on whenever his arthritis acts up.
Healing Lotion Bars make fantastic gifts! I have shared them with friends who now want to make some of their own. (Hint: send your friends to this website!)

The Final Word
I made multiple small batches of healing lotion bars so I could evaluate each batch without wasting a bunch of raw materials on something that was not optimal. It was not that the less-than-perfect batches were a waste; not at all. One batch was too soft and gushy so I re-melted the bars, adding more beeswax. Another batch did not have enough essential oils; and while the bars were a superb moisturizer, I did not feel they would have the soothing and healing effect of my salves.
That said, this is a fun and easy DIY recipe that will give you a lot of room for experimentation. Plus, as I mentioned, a healing lotion bar nestled in an organza or cellophane pouch would make a wonderful gift!
I hope you will give these a try. After you do, come back and share the results including any special combinations of oils that you use. I would love to hear from you and learn from you!
Enjoy your next adventure through common sense and thoughtful preparation!


